🤷♂️ Why Would I Do This?
You’re probably here because you’re paying for speedy Internet and it’s shit because the cheap-ass router your ISP gave you is…well…cheap-ass.
In the furthest corner of my house from our Virgin Hub 4 or 5 or 6 or whatever, I got some f*ing impressive speed differences with a new router. To test, I put the laptop on the floor and connected to the our Virgin Hub’s Wi-Fi, then to the new router’s Wi-Fi in turn running tests on speedtest.net.
We’re on Virgin cable at 110 Mb/s.
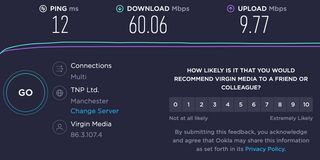
Original Virgin Hub - 34 Mb/s
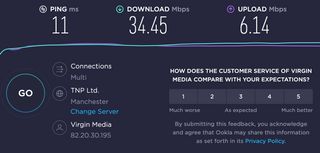
To be fair, this is not bad. It’s about 69% speed loss. Virgin seem to have updated their Hub software (when we first got the Hub, one wall would kill the connection).
New ASUS Router - 56 Mb/s
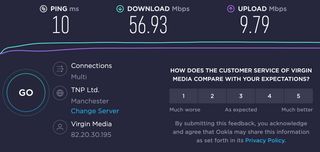
However, without any extra setup you can see the ASUS router adds just over 20 Mb/s to the connection. To put that into perspective, that’s a full copper broadband connection.
That’s why you would do this ☺️
😰 I’m Scared, What if I Break Stuff?
At the end of the guide you’ll find a section called Troubleshooting. It guides you through resetting your router.
If you’re worried because you’re not technical, before you start just grab the router from your ISP and look on the back/sides for a reset button. It’s usually tiny, so you’d use a pen to push it in.
For example, he’s where the button is on the new ASUS router with better Wi-Fi and on our original Virgin router:
If you can find that button and a pen to reach it, then you can reset either router to as it was in the box.
If you get really stuck, you can always call your ISP and tell them “something’s wrong with my Internet and I have literally NO IDEA why it broke 😇”.
Also, if you leave a comment I’ll receive it in an email and I’ll try to help if I can.
😲 Okay. I am PUMPED. How Can I Achieve This Magical Speed Improvement?
Step One
Buy the Router
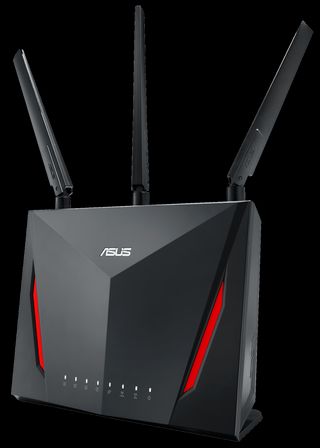
The router you need is the ASUS RT-AC86U.
It’s usually £130 on Amazon (although I’ve seen it around £150) and if you use my links I’ll get 12% commission 😊 but if you can find it cheaper elsewhere, go for it!
It looks like this.
Step Two
Plug the Router In
When your router arrives, whip everything out of the box and start plugging in.
- Screw in the 3 antennae - point them all forwards for now, we’ll get to this later 🙂.
- Plug the router into power.
- Take the Ethernet cable (looks like a giant black telephone cable) and plug one end into one of (1-4, doesn’t matter which) the LAN ports of your current router (from your Internet provider), and the other end into the WAN (blue) port of the new ASUS router.
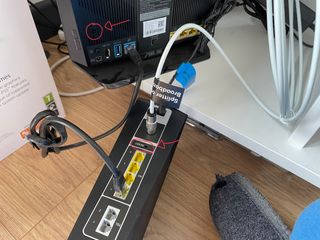
It should look like this:
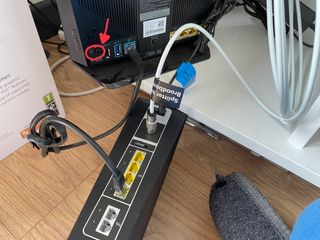
Where the black cable is plugged into a yellow LAN port of my Virgin modem-router and the blue WAN port of the ASUS router.
Once it’s plugged in, press the power button on the new router (red arrow; all the lights on the front should start flashing).
Explanation for nerds: LAN = Local Area Network. WAN = Wide Area Network (e.g. the Internet). Your ISP’s modem-router shares the Internet via Wi-Fi (for now) and those 4 LAN ports. We’re using a LAN port to provide Internet to the new router, but so that the new router recognises it as the Internet we’re going into the WAN (Internet) port of the new router.
The reason we need to go via your ISP’s device is that it’s a modem as well, meaning it gets the Internet via cable (Virgin) or a phone line (BT, Sky, TalkTalk, etc.).
Step Three
Connect to the Router
Right now your new router is powering on for the first time. It’s getting the Internet from your ISP’s modem-router, and it’s made its own new Wi-Fi network for you.
It’s time to configure it.
Open your laptop or a good-sized tablet (preferably not a phone, this is harder on a tiny screen).
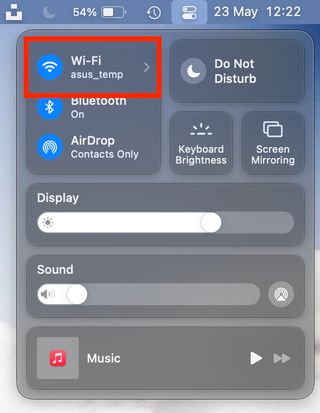
Look for a Wi-Fi network called ASUS_XX
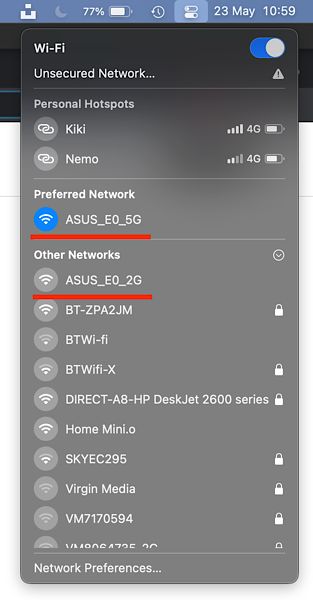
- On a Mac click the little dials icon in the top right and go to Wi-Fi. On a PC it’s the wireless icon in the bottom right. Instructions for a PC here.
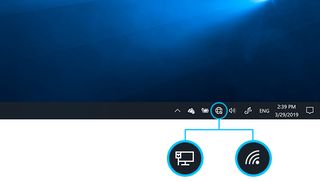
- On a Mac click the little dials icon in the top right and go to Wi-Fi. On a PC it’s the wireless icon in the bottom right. Instructions for a PC here.
Connect to either the 5G or 2G network - whichever has the strongest signal. If they’re the same choose 5G.
Explanation for nerds: 5G, or 5GHz, is a faster Wi-Fi signal because its radio wavelength is shorter, meaning it can carry more data. However, that also means it gets blocked more easily (e.g. by walls). 2G, or 2.4GHz, is a slower signal but travels further and better through walls and other obstacles. However, 2.4GHZ is used by lots of other devices like baby monitors, garage door openers. You shouldn’t need to worry though, because this new router automatically manages which one your devices use.
Step Four
Configure the Router
- While on your new router’s Wi-Fi: open a web browser (Chrome, Safari, Edge).
- Visit this URL: router.asus.com
- If that doesn’t work, try visiting 192.168.1.1 or 192.168.0.1
- If that doesn’t work, jump ahead to step five and use the instructions to get the IP address of the router
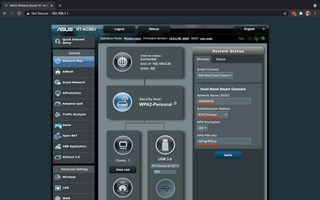
- You should be presented with this screen:
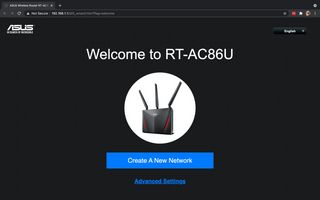
- Hit Create A New Network
Decision Time!
Easy Route
If you just want to be done or test it out, then come up with a brand new Wi-Fi network name (be creative); enter your own password (be secure); and press Apply
Don’t tick Separate 2.4 GHz and 5 GHz unless you know why you’d want to do that.
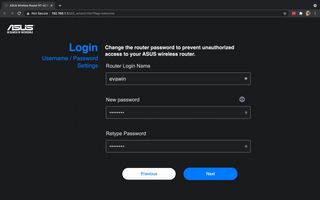
On the next screen, come up with your own login name and admin password (you’ll use these if you log into the router to change settings again).
What Happens Now?
Now your original modem-router from your ISP is still giving out the Internet via its Wi-Fi, but your new fancy ASUS router is also giving out the Internet on a different network name.
Connect to the new network with the cool name you gave it. Test your speeds.
Getting the Most Speed
Remember those antennae you screwed in? One of the nifty things about the ASUS router is it has those three directional antennae.
Play around trying to point them where you want the best Wi-Fi and run speed tests to get the strongest connection.
You Could Stop Here
But you shouldn’t. For a couple of reasons:
- You’ll have to connect every device in your home to the new Wi-Fi to make the most of it.
- You’ve just created another competing network, i.e. your new Wi-Fi is competing with your original one for bandwidth and they might interfere with each other.
To put 2 into perspective, remember earlier I said I got 34 Mb/s with our Virgin router in the corner of the house, 56 Mb/S with the new ASUS router?
Turning off the Virgin router’s Wi-Fi squeezes out an additional 4 Mb/s for a total of 60 Mb/s.
That might not seem much but if you have a lot of devices simultaneously connected and downloading, that impact will be greater.
Two More Steps
Now that you’ve got the router and it’s working, there are two more things to do to for the best setup:
- Disable Wi-Fi on your ISP’s modem-router.
- Set your new router’s Wi-Fi name and password to match your ISP’s.
You could do neither; 1 alone; or 1 and 2 together.
Here’s a quick explanation of each:
Disable Wi-Fi on Your ISP’s Modem-router
This shouldn’t take long but how to do it varies by ISP. With Virgin’s Hub I had an option called “Modem Mode”, which disabled it. With my grandad’s Plusnet router I just had to go into Wi-Fi settings and switch it off. I can’t give you exact instructions but I can guide you.
Explanation for nerds: I keep referring to the new ASUS router and the old ISP’s modem-router. That’s because you need a modem to connect to the Internet - i.e. to receive a BT line or cable connection. However, since Wi-Fi, people have been using routers to share the Internet (strictly speaking a router doesn’t have to have Wi-Fi but most modern ones do). Nowadays most ISPs combine them into one device, a modem-router. We’re going to use the one provided by the ISP purely as a modem because that’s usually what they do best, and we’re using the fancy ASUS router to share the Internet out.
Set Your New Router’s Wi-Fi Name and Password to Match Your ISP’s
This is easily the most useful step. If you do this then every device currently on the Internet in your house will automatically connect to the new router. It saves you having to reconnect everything one by one to a new Wi-Fi (for us, this meant a bunch of Sonos speakers, a smart meter, Google Home, 2 laptops, 2 phones, an Apple Watch…you get the picture).
It’s also quite straightforward to do, but you must turn off your original router’s Wi-Fi first or your devices will get confused.
Step Five
MORE SPEED! (Turn off your original router’s Wi-Fi)
- Rejoin your original Wi-Fi (the one your ISP gave you).
- Now you need to visit the IP address of the modem-router from your ISP in your browser, there are a few ways to do it:
- Guess! No kidding. This is probably the fastest way as most routers are standard, it’s likely to be one of the following. You’ll know it works because you’ll see a router screen instead of an error in your browser.
- 192.168.0.1
- 192.168.1.1 (easily the most common)
- 192.168.2.1
- 192.168.1.254 (BT/Plusnet)
- Google “IP address of [ISP] router” - replace [ISP] with your, e.g. “IP address of BT router”. Usually it’s in the snippet Google gives you at the top.
- Find it from the current Wi-Fi properties. Instructions, or:
- On a PC:
- Press the Windows start button/keyboard key
- Type
cmd - Open Command Prompt
- Type
ipconfig - Press enter
- Look for
Default Gateway:- the numbers after it are your router’s IP address
- On a Mac:
- Click the settings icon
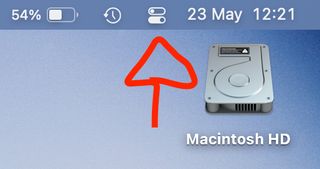
- While holding the Alt or (on older Macs) Option key, which has this symbol ⌥, click the Wi-Fi button
- Under the name of your Wi-Fi, look for Router: - the numbers that follow are your router’s IP address
- Click the settings icon
- On a PC:
- Guess! No kidding. This is probably the fastest way as most routers are standard, it’s likely to be one of the following. You’ll know it works because you’ll see a router screen instead of an error in your browser.
- Once you’ve got to the right IP in your browser you should see a login screen, this is Virgin’s:

- You’ll need to enter a password and possibly username to login to your router and change its settings.
- Sometimes you need to enter it here, sometimes when you get into the settings.
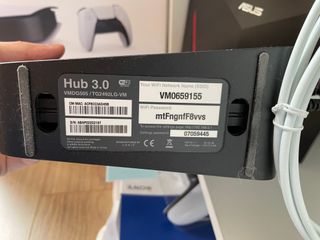
- Usually this password is on a sticker on the back, sides or bottom of your router.
- It’ll say something like “admin password” or “settings password” and it might have the router’s IP as well. Here’s what it looks like on the bottom of our Virgin router:
- You now need to find Wi-Fi or wireless settings and switch off Wi-Fi. This will disconnect every device in the house. Don’t forget to warn people.
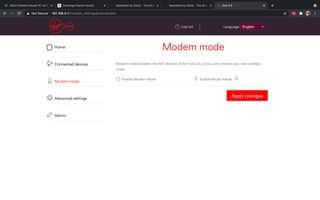
- How to do this varies, on our Virgin router there’s a “Modem mode” option, enabling it turns off Wi-Fi:
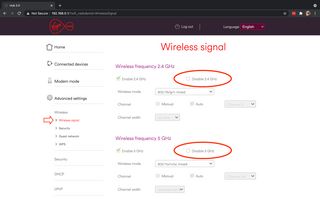
- However I could also have done it manually by going to Advanced settings > Wireless > Wireless signal and checking the two Disable XX GHz options and saving:
- If you’re stuck, Google is your friend. Search for “how to disable Wi-Fi on [ISP] router” replacing [ISP] with yours, e.g. “how to disable Wi-Fi on BT router” - usually your ISP will have a help article with step by step instructions
- How to do this varies, on our Virgin router there’s a “Modem mode” option, enabling it turns off Wi-Fi:
Step Six
Update your new router’s Wi-Fi details
It’s the last step! 🙌
Right, so you’ve kicked everyone off the old Wi-Fi. By now your computer should have rejoined the new router’s Wi-Fi. If it hasn’t, manually join it again.
Now you need to find your ISP’s Wi-Fi details from their router. Again, usually this is on a sticker on the router they gave you, or a little card, or a separate set of stickers, or all of the above!
You can see it on our Virgin router in the picture above. It’s also in the following two places: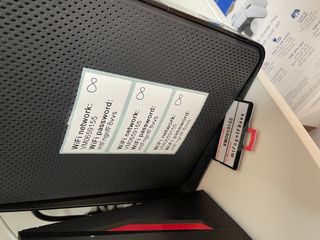
So you usually can’t miss it.
- Log into the new router’s admin website: router.asus.com (or 192.168.1.1, 192.168.0.1 or the same IP as step four if you had to find it manually)
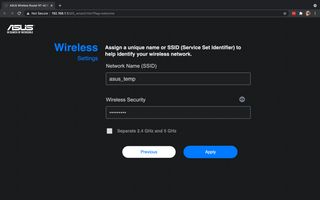
- In the section on the right where you put your cool name and made up password, enter the old router’s details as they are on the sticker/card. CapS MAttEr, so match them exactly.
- For example, if I were matching our old Virgin router ours would look like this:
- Unless you know you need to change it, leave Authentication Method as WPA-2 Personal. It’s the most secure, and even if your old router was on WPA-1 (which is unlikely unless its years old) you should be fine to upgrade and not have to reconnect any devices (I tested and was able to switch between WPA-1 & WPA-2).
- For example, if I were matching our old Virgin router ours would look like this:
- Press Apply
What should happen now is that the router changes its Wi-Fi name and password to match that of your original router exactly.
Once it’s done, all your old devices should reconnect. It’s probably worth switching everything off and on again at this point just to help them all reconnect.
If everything connects up again to the new router, you’re done! 🥳
Enjoy your new speedy Wi-Fi and hopefully faster Internet.
Troubleshooting
Step one: re-read
Seriously, it’s easy to miss one little thing and the whole lot won’t work. Go through and check you did everything, also double check you pressed Apply or saved settings after entering them. As long as you can still login to the routers’ admin interfaces you can still change settings.
If you can’t connect to your ISP’s router because you turned the Wi-Fi off, unplug the Ethernet cable from the WAN port of the ASUS router and plug it into your computer. Now you should be able to connect and turn the Wi-Fi on again if necessary. If you don’t have an Ethernet port, see step two.
Step two: reset
Every router can be reset with a button on the back and a pen. The ASUS router has a little “Reset” button. Push it in with a pen, hold for 10s then release. It should go back to how it came in the box.
The same goes for your ISP’s router. Either look for the reset button on the back and press and hold, usually 10s or until all the lights start flashing will do, or Google it: “how to factory reset [ISP] router”. Again, most ISPs will have help articles on their own websites for this.
Factory resetting will restore the routers to how they came, so you can break stuff and redo without worry.
Wait, What If I Change Broadband Provider (ISP)?
If you sack off your broadband provider and get a new one, this will actually save you a bunch of time.
That’s because you don’t need to change Wi-Fi networks because everything stays connected to your new ASUS router. All you need to do is unplug the LAN cable from your old ISP’s modem-router, plug it into the new one (keep the WAN end plugged into the ASUS router) and disable Wi-Fi on the new ISP’s router - in other words, repeat step five.
That’s it!
I hope it works out for you. If you get into trouble or indeed if it works and you just want to say “THANK YOU SO MUCH JAMIE” then please, hit me up in the comments.
Jamie