Update: the CyanogenMod project has ceased and it is becoming LineageOS. I'll update this, or write a new guide when I know more.
You can download nightly builds of LineageOS for your Wileyfox here: https://download.lineageos.org/crackling. At the time of writing, there is no LineageOS recovery. From what I've read on forums, TWRP is superior anyway - you can download it here for the Swift: https://twrp.me/devices/wileyfoxswift.html.
I have not tested them as I gave my Swift away to a family member. The steps should be similar to below but as you'll be using a different recovery software, they'll look slightly different. Proceed carefully and Google if you get stuck. There are some very helpful forums out there, which have helped me get out of a bind or two before.
If you do test them, I'd love to know how it goes in the comments below, and good luck :-)
Warning: modifying your phone may brick it or void its warranty
This guide was written for Mac OS X. You’ll need to substitute some instructions if you’re following on Windows/Linux - Google is your friend.
Also, it was written for the Wileyfox Swift 1. I have not tested it on the Swift 2; if you do, take care and let me know how it goes in the comments.
I’ve got to admit, this took me some time to figure out. I was following the CyanogenMod guide here. Right up until step 7 of ‘Unlocking the bootloader’, everything was great. But then I got stuck with < waiting for any device > in Terminal.
I gave it a few tries and realised the only commands that weren’t working were the ones that included the vendor ID. I discovered that my device’s vendor ID is different from what CyanogenMod’s guide suggests it should be (I’m not sure why). This guide will include finding your own vendor ID to ensure your Fastboot commands work.
There were a few other things that didn’t work for me as they were specified in CyanogenMod’s guide, so I’ve written this to cover the whole process (including installing Google Apps).
If you just want to see how to get your vendor ID, jump to that section.
What’s in the guide?
- Prerequisites
- Safety precautions to protect your phone
- Installing ADB and Fastboot
- Downloading CyanogenMod, CyanogenMod recovery image and Google Apps (GAPPS)
- Unlocking your Wileyfox Swift’s bootloader
- Enabling the developer menu, USB debugging and OEM unlocking
- Finding your vendor ID
- Rebooting to recovery
- Using Fastboot to unlock your bootloader
- Installing CyanogenMod recovery
- Flashing via Fastboot
- Installing CyanogenMod and Google Apps (GAPPS)
- Factory data reset
- Sideloading via ADB
Prerequisites
Safety Precautions
- Back up your data
- Use a good quality USB cable.
- Seriously. The first time I tried this I got stuck because my USB cable was crappy. I recommend using your official Wileyfox cable as it’s the best fit for the phone’s USB port.
- Make sure your Mac (PC if you’re using one) won’t go to sleep during the process.
- Consider Caffeine for Mac or Caffeinated for Windows.
- Be sensible. If you don’t understand something, Google it.
- Keep this link handy, use it to download stock Cyanogen OS if you want to set your phone back to factory.
Installing ADB and Fastboot (from Terminal)
- Install Homebrew:
/usr/bin/ruby -e "$(curl -fsSL https://raw.githubusercontent.com/Homebrew/install/master/install)"
- Install ADB & Fastboot:
brew install android-platform-tools
- Confirm both, entering:
which adb- Should return
/usr/local/bin/adb
- Should return
which fastboot- Should return
/usr/local/bin/fastboot
- Should return
- Install Homebrew:
Download everything you need
- CyanogenMod and CyanogenMod Recovery
- Or download whichever version you want from the CyanogenMod page: https://download.cyanogenmod.org/?device=crackling
- Google Apps
- You need the ARM64 version of the Android matching your CyanogenMod.
- I recommend Nano, it provides the basic framework, then you can download whatever else you want from the Play Store; saving space and memory. (Stock was too big for my 'fox anyway).
- Find out which version of Android your CyanogenMod download is running here.
- Compare Open GApps versions here.
- CyanogenMod and CyanogenMod Recovery
Unlocking your Wileyfox Swift’s bootloader
Enabling the developer menu, USB debugging and OEM unlocking
- Open Settings.
- Scroll down to the bottom and navigate to About phone.
- Locate the Build number.
- Tap it until the screen displays the message:
You have enabled development settings!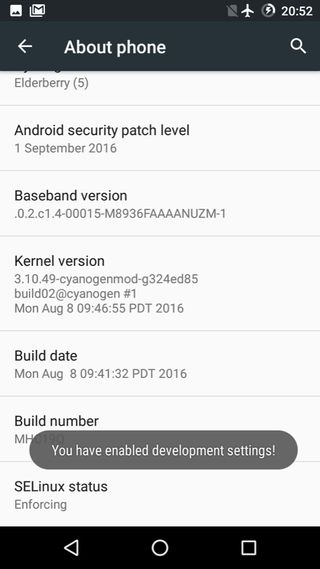
- Navigate back to Settings.
- Open Developer options.
- Scroll down to and enable OEM unlocking.
- Scroll further down to and enable Android debugging.
- You will be asked to Allow USB debugging? at this point, and presented with an RSA key fingerprint. First tick Always allow from this computer, then press Ok.
Rebooting to Fastboot
- Open Terminal.
- Run the following command:
adb reboot bootloader
Finding your vendor ID
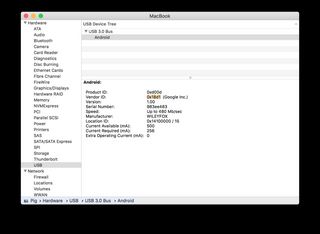
You’re running this after rebooting to Fastboot deliberately. While in Fastboot my Swift reports a different vendor ID (one from Google Inc. according to System Information). You need the Fastboot vendor ID to run the following commands.
- With your Wileyfox still plugged into your Mac, open System Information (search for it in Spotlight).
- Click on USB on the left, then on Android.
- Copy your Vendor ID from the main screen.
- Verify the vendor ID by entering the following command (replacing
0x18d1with your vendor ID, unless it’s the same):fastboot -i 0x18d1 devices
- You should see something like this:
983ee483 fastboot
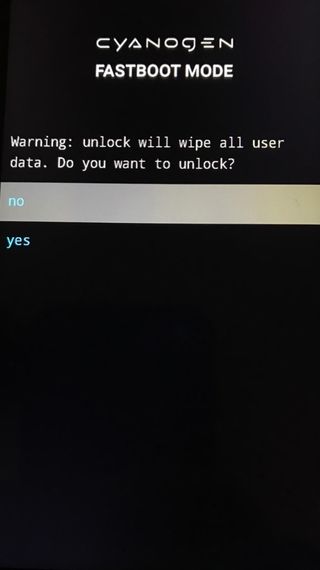
Using Fastboot to unlock your bootloader
- Run the following command:
fastboot -i 0x18d1 oem unlock-goTHIS. WILL. ERASE. ALL. DATA.
- Choose “yes” by using the volume down followed by power buttons.
- Now choose Reboot to Android.
- Run the following command:
It’ll take time to optimise apps so make yourself a cuppa/coffee/long glass of water.
When it’s done, go through the setup screens (you’re resetting again so skip everything) then re-enable USB debugging (come back here afterwards).
Installing CyanogenMod recovery
Flashing via Fastboot
- With USB debugging enabled again, go back to Terminal and enter:
adb reboot bootloader
- Verify the connection:
fastboot devices
- If you see your device, enter:
fastboot flash recovery /path/to/cyanogen/recovery- Replace
/path/to/cyanogen/recoverywith the full path to your CyanogenMod Recovery file. - TIP: Drag and drop the recovery file into Terminal from Downloads.
- On your Wileyfox, select Reboot to Recovery (volume up/down to move, power to choose).

- With USB debugging enabled again, go back to Terminal and enter:
Installing CyanogenMod and Google Apps (GApps)
Factory data reset
- Choose Factory reset from the menu.
- Choose Yes from the next menu.
- Choose Full factory reset if asked. THIS. WILL. ERASE. ALL. DATA…AGAIN.
- Press the back button at the bottom (left triangle) to return to the main menu.
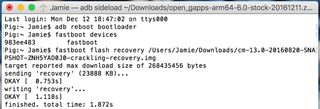
Sideloading via ADB
- Choose Apply update.
- Choose Apply from ADB.
- In Terminal enter:
adb sideload /path/to/cyanogenmod/rom- Replacing
/path/to/cyanogenmod/romwith the full path to the CyanogenMod ROM (not recovery) you downloaded earlier. - Don’t forget to drag and drop into Terminal.
- Wait for it to finish uploading.
- **DO NOT unplug the USB cable.
- DO NOT let your computer sleep.**
- If you downloaded and haven’t activated Caffeine(ated), now is the time to activate.
Now do the same for the Google Apps package you downloaded. Skip this if you don’t want Google Apps (you won’t have a Play Store).
- Apply update.
- Apply from ADB.
adb sideload /path/to/gapps- In Terminal, replace
/path/to/gappswith the real path.
- In Terminal, replace
- Wait patiently.
When all’s said and done, Reboot system now and get excited. Your device should boot into a clean, crapware-free CyanogenMod. Ready for you to install whatever you want :-)
If you run into problems, post in the comments. I’ll do what I can to help.
Further reading (careful, I’m inviting you into a rabbit hole now; I’ve spent many a night tinkering with people’s custom ROMs from XDA): http://forum.xda-developers.com/wileyfox-swift
Enjoy.
Jamie