MailChimp is a great (free, and I love free) way to allow people to subscribe to email updates from your blog. As soon as I can figure out some of Ghost’s RSS kinks, I’ll enable it for this blog (in addition to RSS subscriptions).
However, if like me you’ve been using CloudFlare’s Flexible SSL and you followed CloudFlare’s guide to get it working, you’re probably going to run into this error when you try to setup an RSS-driven campaign in MailChimp"

Despite the fact that (in my case at least) W3C validates your RSS feed perfectly.
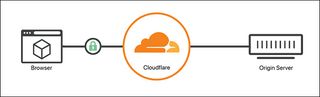
That’s because of the way CloudFlare’s Flexible SSL works. Instead of providing full SSL, it only secures the traffic between your reader and CloudFlare. Best explained by CloudFlare using this diagram:
MailChimp seems to detect that your origin server (the one providing the RSS feed) doesn’t have SSL enabled and so rejects the feed. To work around the problem, you’ll need to add a page rule to CloudFlare.
How to fix it
Open “Page Rules” for the website you want to fix.
Create a new rule.
For the pattern, use the full http URL of your RSS feed (not https), for example, mine is
http://jamiegoodwin.uk/rss/.In the rule’s settings, scroll down to SSL and switch it off (make sure “Always use https” is off).

Save the rule.
In the rules overview, use the bars to the left of your new rule to move it above the “Always use https” rule for your blog.
You should end up with something that looks similar to this:

Go back to MailChimp and give it the non-HTTPS version of your feed (e.g. for me: http://jamiegoodwin.uk/rss/)
Enjoy your new email campaigns!
Problems? Stick 'em in the comments :-)