You will need: Raspberry Pi, SD card, USB stick, the Internet, basic understanding of ‘nano’ (ctrl + x, then y to save and quit is pretty much enough)
Estimated duration: 30 minutes
This is a reproduction of an excellent guide from paulv. I’ve condensed and reproduced it here to incorporate into a larger guide (coming soon).
In most cases, this should help to speed the Pi up a little. Either way, it should definitely help to prevent your SD card becoming corrupt.
Let’s get started.
1. Grab yourself the latest copy of Raspbian
Download the latest Raspbian image from raspberrypi.org/downloads, and write it to your SD card. If you’re on Linux (or Mac OS X), run the following in Terminal:
sudo dd if=path_of_your_image.img of=/dev/diskn bs=1m
Windows: Win32DiskImager
When it’s finished, pop it into the Raspberry Pi and power up.
Don’t put your USB stick in yet.
2. Configure the Pi
SSH into the Pi and run the configuration utility:
sudo raspi-config
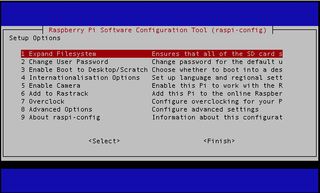
Change only the following settings:
- User password (for security, you should always change this).
- Overclock (use ‘Turbo’ mode, it’s covered by your warranty)
- Memory split (allocate 16M for GPU)
Finish. Reboot. Crack on.
Once it’s rebooted, plugin your USB stick and run:
dmesg
At the end of the output, you should see a few references to sdx, where x is unique to your USB stick. If you only have one in, it’s most likely sda, in which case you can find the stick at: /dev/sda
If yours is different, modify the following commands to apply to your situation.
3. Migrate to the USB stick
Run fdisk on the USB stick:
sudo fdisk /dev/sda
Delete the existing partitions:
d
Create a new partition:
n
Change anything you want, or just press return to each question to set defaults (I did). Then write the changes:
w
Once they’re all written, format the drive:
sudo mke2fs -t ext4 -L rootfs /dev/sda1
Then mount the drive:
sudo mount /dev/sda1 /mnt
Now, edit fstab to disable the SD card’s main partition (not boot) and enable the USB stick:
sudo nano /etc/fstab
Stick a # in front of /dev/mmcblk0p2 and add a line for /dev/sda1. It should look something like this:
proc           /proc    proc    defaults         0    0
/dev/sda1      /        ext4    defaults,noatime 0    1
/dev/mmcblk0p1 /boot    vfat    defaults         0    2
#/dev/mmcblk0p2 /        ext4    defaults,noatime 0    1
# a swapfile is not a swap partition, so no using swapon|off from here on, use  dphys-swapfile swap[on|off]  for that
Now copy everything over to the USB stick:
sudo rsync -axv / /mnt
This’ll take around 15 minutes. Stick the kettle on. When it’s finished, backup and edit cmdline.txt:
sudo cp /boot/cmdline.txt /boot/cmdline.bak
Now, edit it to point to your USB stick and add a 5 second delay:
sudo nano /boot/cmdline.txt
Change root=/dev/mmcblk0p2 to /dev/sda1 and add rootdelay=5 at the end (mine looks like this):
dwc_otg.lpm_enable=0 console=ttyAMA0,115200 kgdboc=ttyAMA0,115200 console=tty1 root=/dev/sda1 rootfstype=ext4 elevator=deadline rootwait rootdelay=5
That’s it! Save the file and reboot. You should be running from your USB stick:
sudo reboot
To make sure you are, run:
df -h
The size of rootfs should reflect your USB stick’s size. If it does, congratulations! You’re all set. If something went wrong, I recommend you peruse the comments on paulv’s original write up.
In fact, I highly recommend you pop over there and leave a thank you message anyway.
The last thing to do is run:
sudo apt-get update
sudo apt-get upgrade -y
sudo apt-get autoremove
To update everything.
Following “how to run Ghost effectively from a Raspberry Pi?”
Next tutorial: How to set up node.js on a Raspberry Pi